Cloud deployment
Interacting with a major cloud provider may have become a much needed task that's part of your delivery process. With GitLab you can deploy your application anywhere.
For some specific deployment targets, GitLab makes this process less painful by providing Docker images with the needed libraries and tools pre-installed. By referencing them in your CI/CD pipeline, you can interact with your chosen cloud provider more easily.
AWS
GitLab provides Docker images that you can use to run AWS commands from GitLab CI/CD, and a template to make it easier to deploy to AWS.
Quick start
If you're using GitLab.com, see the quick start guide for setting up Continuous Deployment to AWS Elastic Container Service (ECS).
Run AWS commands from GitLab CI/CD
Introduced in GitLab 12.6.
The GitLab AWS Docker image provides the AWS Command Line Interface,
which enables you to run aws commands. As part of your deployment strategy, you can run aws commands directly from
.gitlab-ci.yml by specifying the GitLab AWS Docker image.
Some credentials are required to be able to run aws commands:
-
Sign up for an AWS account if you don't have one yet.
-
Log in onto the console and create a new IAM user.
-
Select your newly created user to access its details. Navigate to Security credentials > Create a new access key.
NOTE: A new Access key ID and Secret access key are generated. Please take a note of them right away.
-
In your GitLab project, go to Settings > CI/CD. Set the following as CI/CD variables (see table below):
- Access key ID.
- Secret access key.
- Region code. You can check the list of AWS regional endpoints. You might want to check if the AWS service you intend to use is available in the chosen region.
Environment variable name Value AWS_ACCESS_KEY_IDYour Access key ID AWS_SECRET_ACCESS_KEYYour Secret access key AWS_DEFAULT_REGIONYour region code -
You can now use
awscommands in the.gitlab-ci.ymlfile of this project:deploy: stage: deploy image: registry.gitlab.com/gitlab-org/cloud-deploy/aws-base:latest # see the note below script: - aws s3 ... - aws create-deployment ...NOTE: The image used in the example above (
registry.gitlab.com/gitlab-org/cloud-deploy/aws-base:latest) is hosted on the GitLab Container Registry and is ready to use. Alternatively, replace the image with one hosted on AWS ECR.
Use an AWS Elastic Container Registry (ECR) image in your CI/CD
Instead of referencing an image hosted on the GitLab Registry, you can reference an image hosted on any third-party registry, such as the Amazon Elastic Container Registry (ECR).
To do so, push your image into your ECR
repository.
Then reference it in your .gitlab-ci.yml file and replace the image
path to point to your ECR image.
Deploy your application to the AWS Elastic Container Service (ECS)
- Introduced in GitLab 12.9.
- The
Deploy-ECS.gitlab-ci.ymltemplate was moved toAWS/Deploy-ECS.gitlab-ci.ymlin GitLab 13.2.
GitLab provides a series of CI templates that you can include in your project.
To automate deployments of your application to your Amazon Elastic Container Service (AWS ECS)
cluster, you can include the AWS/Deploy-ECS.gitlab-ci.yml template in your .gitlab-ci.yml file.
GitLab also provides Docker images that can be used in your gitlab-ci.yml file to simplify working with AWS:
- Use
registry.gitlab.com/gitlab-org/cloud-deploy/aws-base:latestto use AWS CLI commands. - Use
registry.gitlab.com/gitlab-org/cloud-deploy/aws-ecs:latestto deploy your application to AWS ECS.
Before getting started with this process, you need a cluster on AWS ECS, as well as related components, like an ECS service, ECS task definition, a database on AWS RDS, and so on. Read more about AWS ECS.
The ECS task definition can be:
- An existing task definition in AWS ECS
- A JSON file containing a task definition. Create the JSON file by using the template provided in
the AWS documentation.
Copy the task definition into a new file in your project, for example
<project-root>/ci/aws/task-definition.json. Available in GitLab 13.3 and later.
After you have these prerequisites ready, follow these steps:
-
Make sure your AWS credentials are set up as CI/CD variables for your project. You can follow the steps above to complete this setup.
-
Add these variables to your project's
.gitlab-ci.ymlfile, or in the project's CI/CD settings:-
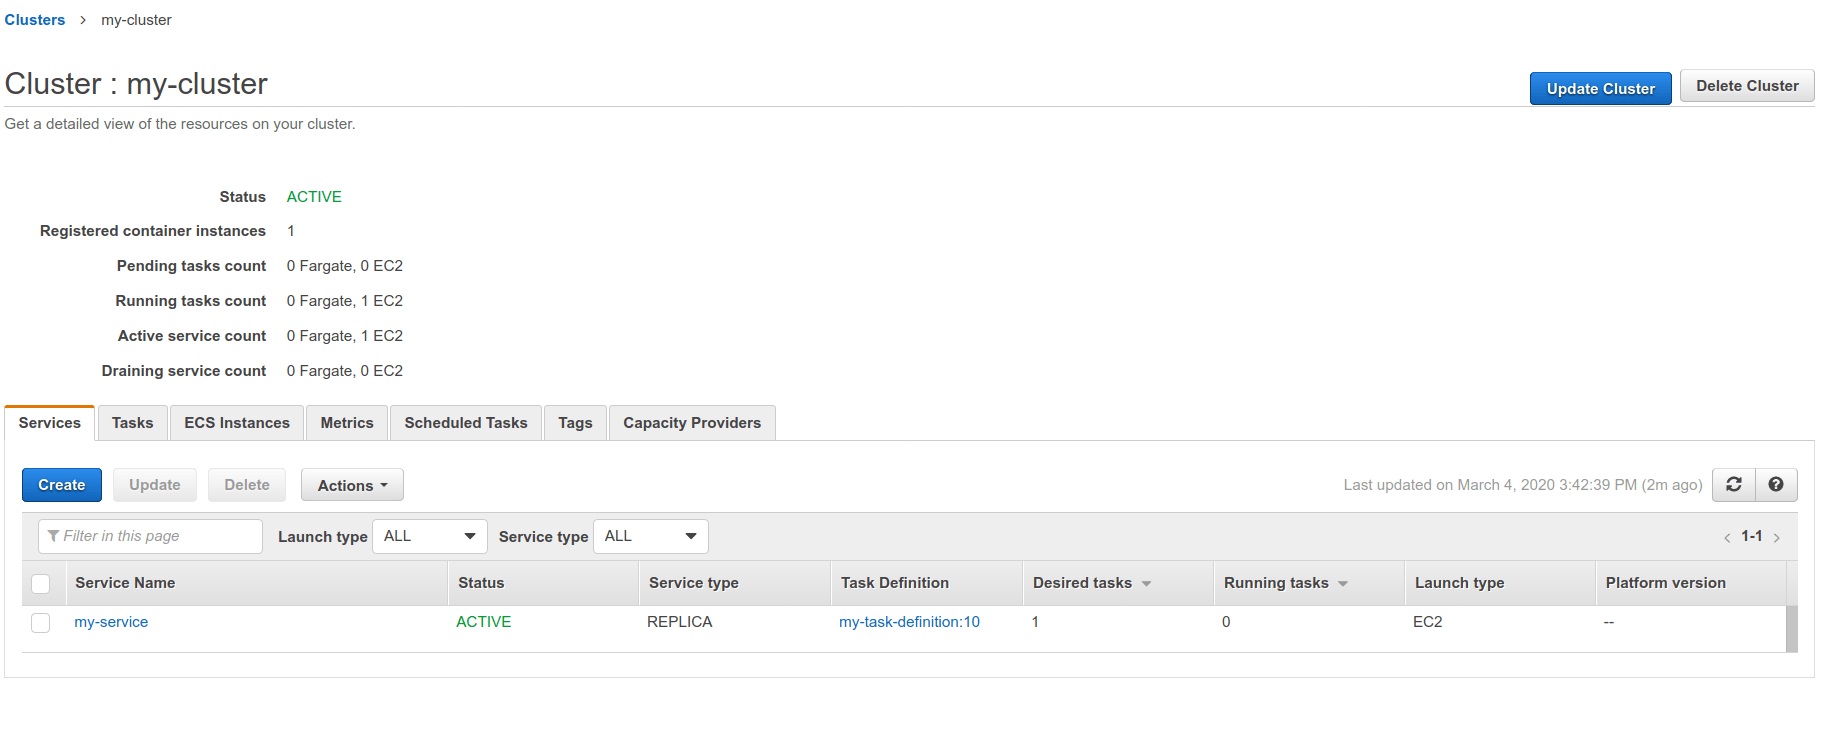
CI_AWS_ECS_CLUSTER: The name of the AWS ECS cluster that you're targeting for your deployments. -
CI_AWS_ECS_SERVICE: The name of the targeted service tied to your AWS ECS cluster. -
CI_AWS_ECS_TASK_DEFINITION: The name of an existing task definition in ECS tied to the service mentioned above.
variables:
  CI_AWS_ECS_CLUSTER: my-cluster
  CI_AWS_ECS_SERVICE: my-service
  CI_AWS_ECS_TASK_DEFINITION: my-task-definition
You can find these names after selecting the targeted cluster on your AWS ECS dashboard:

Alternatively, if you want to use a task definition defined in a JSON file, use
CI_AWS_ECS_TASK_DEFINITION_FILEinstead:variables: CI_AWS_ECS_CLUSTER: my-cluster CI_AWS_ECS_SERVICE: my-service CI_AWS_ECS_TASK_DEFINITION_FILE: ci/aws/my_task_definition.jsonYou can create your
CI_AWS_ECS_TASK_DEFINITION_FILEvariable as a file-typed CI/CD variable instead of a regular CI/CD variable. If you choose to do so, set the variable value to be the full contents of the JSON task definition. You can then remove the JSON file from your project.In both cases, make sure that the value for the
containerDefinitions[].nameattribute is the same as theContainer namedefined in your targeted ECS service.WARNING:
CI_AWS_ECS_TASK_DEFINITION_FILEtakes precedence overCI_AWS_ECS_TASK_DEFINITIONif both these variables are defined within your project.NOTE: If the name of the task definition you wrote in your JSON file is the same name as an existing task definition on AWS, then a new revision is created for it. Otherwise, a brand new task definition is created, starting at revision 1.
-
-
Include this template in
.gitlab-ci.yml:include: - template: AWS/Deploy-ECS.gitlab-ci.ymlThe
AWS/Deploy-ECStemplate ships with GitLab and is available on GitLab.com. -
Commit and push your updated
.gitlab-ci.ymlto your project's repository, and you're done!Your application Docker image is rebuilt and pushed to the GitLab registry. If your image is located in a private registry, make sure your task definition is configured with a
repositoryCredentialsattribute.Then the targeted task definition is updated with the location of the new Docker image, and a new revision is created in ECS as result.
Finally, your AWS ECS service is updated with the new revision of the task definition, making the cluster pull the newest version of your application.
WARNING:
The AWS/Deploy-ECS.gitlab-ci.yml
template includes both the Jobs/Build.gitlab-ci.yml
and Jobs/Deploy/ECS.gitlab-ci.yml
"sub-templates". Do not include these "sub-templates" on their own, and only include the main
AWS/Deploy-ECS.gitlab-ci.yml template. The "sub-templates" are designed to only be
used along with the main template. They may move or change unexpectedly causing your
pipeline to fail if you didn't include the main template. Also, the job names within
these templates may change. Do not override these jobs names in your own pipeline,
as the override stops working when the name changes.
Alternatively, if you don't wish to use the AWS/Deploy-ECS.gitlab-ci.yml template
to deploy to AWS ECS, you can always use our
aws-base Docker image to run your own AWS CLI commands for ECS.
deploy:
  stage: deploy
  image: registry.gitlab.com/gitlab-org/cloud-deploy/aws-base:latest
  script:
    - aws ecs register-task-definition ...
Provision and deploy to your AWS Elastic Compute Cloud (EC2)
Introduced in GitLab 13.5.
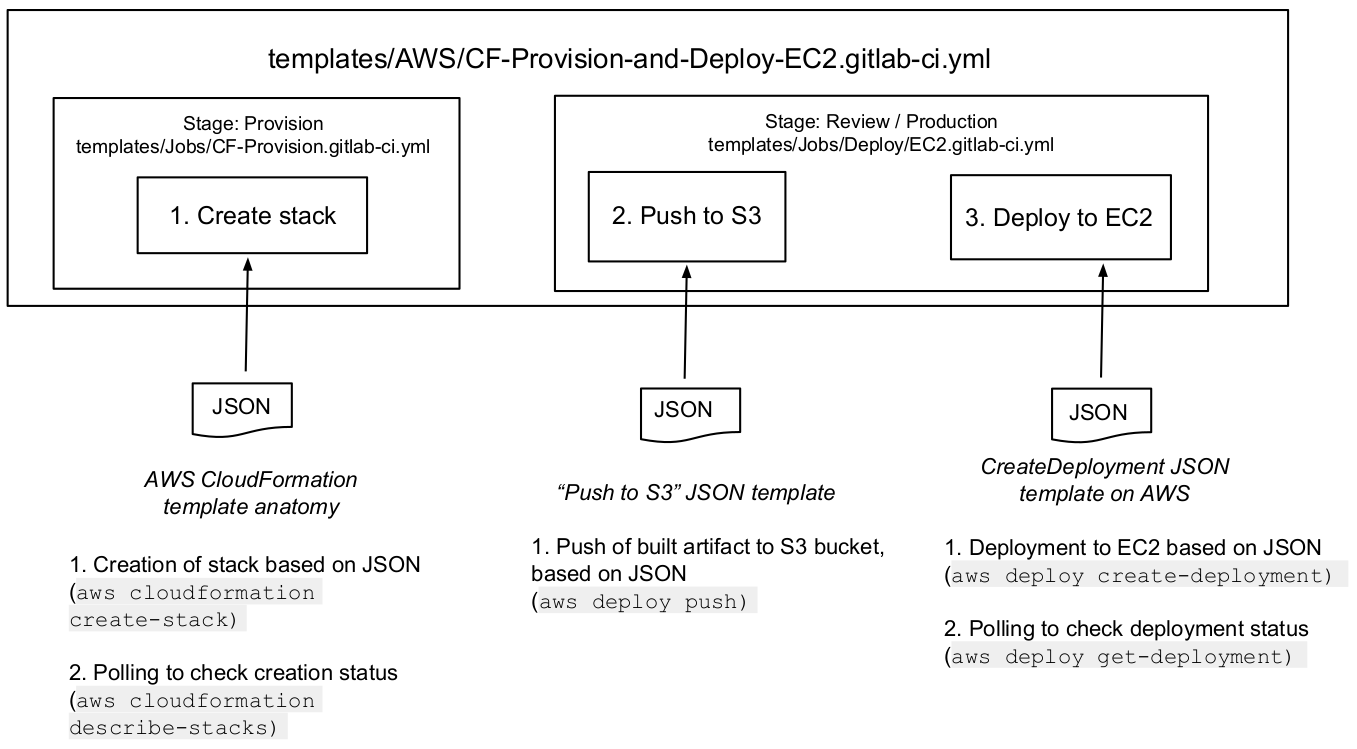
You can use the AWS/CF-Provision-and-Deploy-EC2 CI template to perform the
following actions within the same pipeline:
- Create stack: Provision your own infrastructure by leveraging the AWS CloudFormation API.
- Push to S3: Push your previously-built artifact to an AWS S3 bucket.
- Deploy to EC2: Deploy this pushed content onto an AWS EC2 instance.
Run the AWS/CF-Provision-and-Deploy-EC2.gitlab-ci.yml template
To run the AWS/CF-Provision-and-Deploy-EC2.gitlab-ci.yml template, you must
pass three JSON input objects, based on existing templates:
-
The AWS documentation provides templates for the Create stack and Deploy to EC2 steps (links below). We provide the template for the remaining step, Push to S3:
-
Template for the Push to S3 step. Note that
sourceis where a precedingbuildjob built your application, exporting the build throughartifacts:paths:{ "applicationName": "string", "source": "string", "s3Location": "s3://your/bucket/project_built_file...]" }
-
After you have completed these three templates based on your requirements, you have two ways to pass in these JSON objects:
-
They can be three actual files located in your project. You must specify their path relative to your project root in your
.gitlab-ci.ymlfile, using the following CI/CD variables. For example, if your files are in a<project_root>/awsfolder:variables: CI_AWS_CF_CREATE_STACK_FILE: 'aws/cf_create_stack.json' CI_AWS_S3_PUSH_FILE: 'aws/s3_push.json' CI_AWS_EC2_DEPLOYMENT_FILE: 'aws/create_deployment.json' -
Alternatively, you can provide these JSON objects as file-typed CI/CD variables. In your project, go to Settings > CI/CD > Variables and add the three variables listed above as file-typed CI/CD variables. For each variable, set the value to its corresponding JSON object.
-
-
Provide the name of the stack you're creating and/or targeting, as a CI/CD variable:
variables: CI_AWS_CF_STACK_NAME: 'YourStackName' -
Add this CI template to your
.gitlab-ci.yml:include: - template: AWS/CF-Provision-and-Deploy-EC2.gitlab-ci.yml
When running your project pipeline at this point:
- Your AWS CloudFormation stack is created based on the content of your
CI_AWS_CF_CREATE_STACK_FILEfile/variable. If your stack already exists, this step is skipped, but theprovisionjob it belongs to still runs. - Your built application is pushed to your S3 bucket then and deployed to your EC2 instance, based on the related JSON object's content. The deployment job finishes whenever the deployment to EC2 is done or has failed.
Custom build job for Auto DevOps
Introduced in GitLab 13.6.
To leverage Auto DevOps for your project when deploying to AWS EC2, first you must define your AWS credentials as CI/CD variables.
Next, define a job for the build stage. To do so, you must reference the
Auto-DevOps.gitlab-ci.yml template and include a job named build_artifact in your
.gitlab-ci.yml file. For example:
# .gitlab-ci.yml

include:
  - template: Auto-DevOps.gitlab-ci.yml

variables:
  AUTO_DEVOPS_PLATFORM_TARGET: EC2

build_artifact:
  stage: build
  script:
    - <your build script goes here>
  artifacts:
    paths:
      - <built artifact>
For a video walkthrough of this configuration process, see Auto Deploy to EC2.